VMware Virtual Volumes (aka VVOL) was introduced in vSphere 6.0 to allow vSphere administrators to be able to manage external storage resources (and especially the storage requirements for individual VM’s) through a policy-based mechanism (called Storage Policy Based Management – or SPBM).
VVOL in itself is not a product, but more of a framework that VMware has defined where each storage vendor can use this framework to enable SPBM for vSphere administrators by implementing the underlying components like VASA providers, Containers with its Storage Capabilities and Protocol Endpoint in their own way (a good background on VVOLs can be found in this KB article). This makes it easy for each storage vendor to get started with introducing VVOL support, but also means that it is not easy comparing different vendors with regard to this feature (“YES we support VVOL’s …” does not really say much about the way an individual vendor has implemented this feature in their storage array and how they compare to other vendors).
In this blog I want to show the way Nimble Storage (now part of HPE) has implemented VVOL support. For now I will focus on the initial integration part. In a future blog I will show how this integration can be used to address the Nimble Storage capabilities for individual VM’s through the use of storage policies.
Nimble Storage has been one of the early VVOL adopters. They have chosen to implement the VASA provider (the control path between vSphere and the storage array) as part of the Nimble Storage firmware. Advantage of this approach in my view is the fact that the Nimble Storage controller architecture already has high availability built in, which means that in case a single storage controller is not available because of planned or unplanned downtime, the VASA provider maintains connectivity (which is a requirement for example to be able to start a VM which is stored on a VVOL datastore). In my lab environment I use a virtual Nimble Storage array running firmware version 4.1.0 which is currently the latest version and supports vSphere 6.5 as well as VASA version 3.0. The latter is important to understand as VASA 3.0 has introduced the capability to address VM (storage) replication requirements via storage policies.
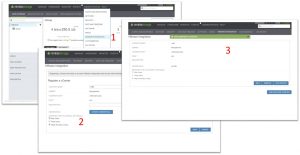
The first step in integrating the Nimble Storage array with VMware is to register the VASA provider. Nimble Storage has made this an easy process by creating a simple wizard in their web-based administration portal. Under “Administration > VMware Integration” you will find the option to register plugins into a vCenter environment by providing the vCenter server IP address and valid credentials and in this case checking the “VASA Provider” checkbox.
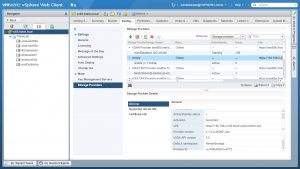
The proper registration of the VASA provider can be verified by logging into the vSphere 6.5 WebClient, selecting the vCenter server object in the inventory and looking under “Configure > Storage Providers” (you might need to refresh the list by clicking the appropriate icon at the top). You can see from the screenshot that the Nimble Storage VASA provider is listed and is shown as supporting VASA version 3.0
Now the control path is established we can create the storage container as well as the data path (between the ESXi hosts and the Nimble Storage array). First the storage container.
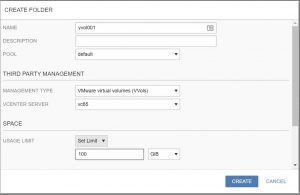
Nimble already used the concept of “Folders” to group volumes for the purpose of organization, management and/or delegation. As every VM in a VVOL environment is essentially also a set of (virtual) volumes it makes sense that this same concept is used to create a VVOL container. Just add a folder to the Nimble Storage array, give it a name and a size (can be changed later) and specify which vCenter server is managing this container for VVOL.
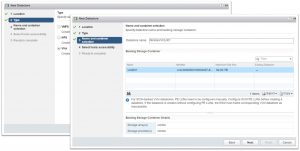
This is all we need to do on the Nimble Storage array side. Now we can go to the vSphere WebClient once more and create a VVOL datastore which will map to the container we just created on the storage array. Just use the regular “New Datastore” wizard and choose the datastore type “VVol”, select the container you created and give the datastore a name.
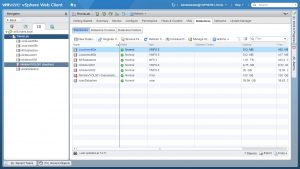
Once the wizard has ended the WebClient will show the new VVOL datastore. In my environment however the datastore was shown as “inactive/inaccessible” …
Reason for this is that we now have created a “logical” VVOL datastore, but have not yet established a data path to the “physical” container. For this purpose we need to be able to communicate with the VASA component which we call a “Protocol Endpoint” (PE). The way a PE is implemented by the storage vendor is dependent on the type of array which is being used (NFS, FC, iSCSI). In this case we are using an iSCSI array (Nimble Storage arrays can use either FC or iSCSI as the storage transport) and the PE is implemented as a LUN. Be aware, that this LUN is NOT the container itself, but merely provides the path TO the container.
A single PE can be used for multiple containers or multiple PE’s can be used … again depending on the implementation decision of the storage vendor. In the case of Nimble Storage a single PE can be used to address multiple VVOL containers. However since I had not created a VVOL datastore before, the PE had not been discovered yet, causing the VVOL datastore to become “inactive/inaccessible”. In my case a simple “Storage Rescan” was enough to solve this issue. This was because I had already used the array for “traditional” (iSCSI-based) VMFS datastores and a valid iSCSI configuration already existed.
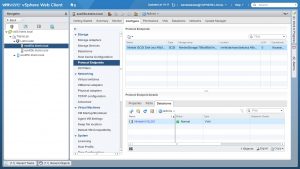
The screenshot below shows the PE which can be seen in the WebClient by selecting the ESXi hosts and check out “Configure > Storage > Protocol Endpoints”.
Now we have both the control path (VASA Provider) and data path (Container/VVOL datastore and PE) setup and we are ready to start creating VM’s on this VVOL datastore. More on this subject in a next blog article.

